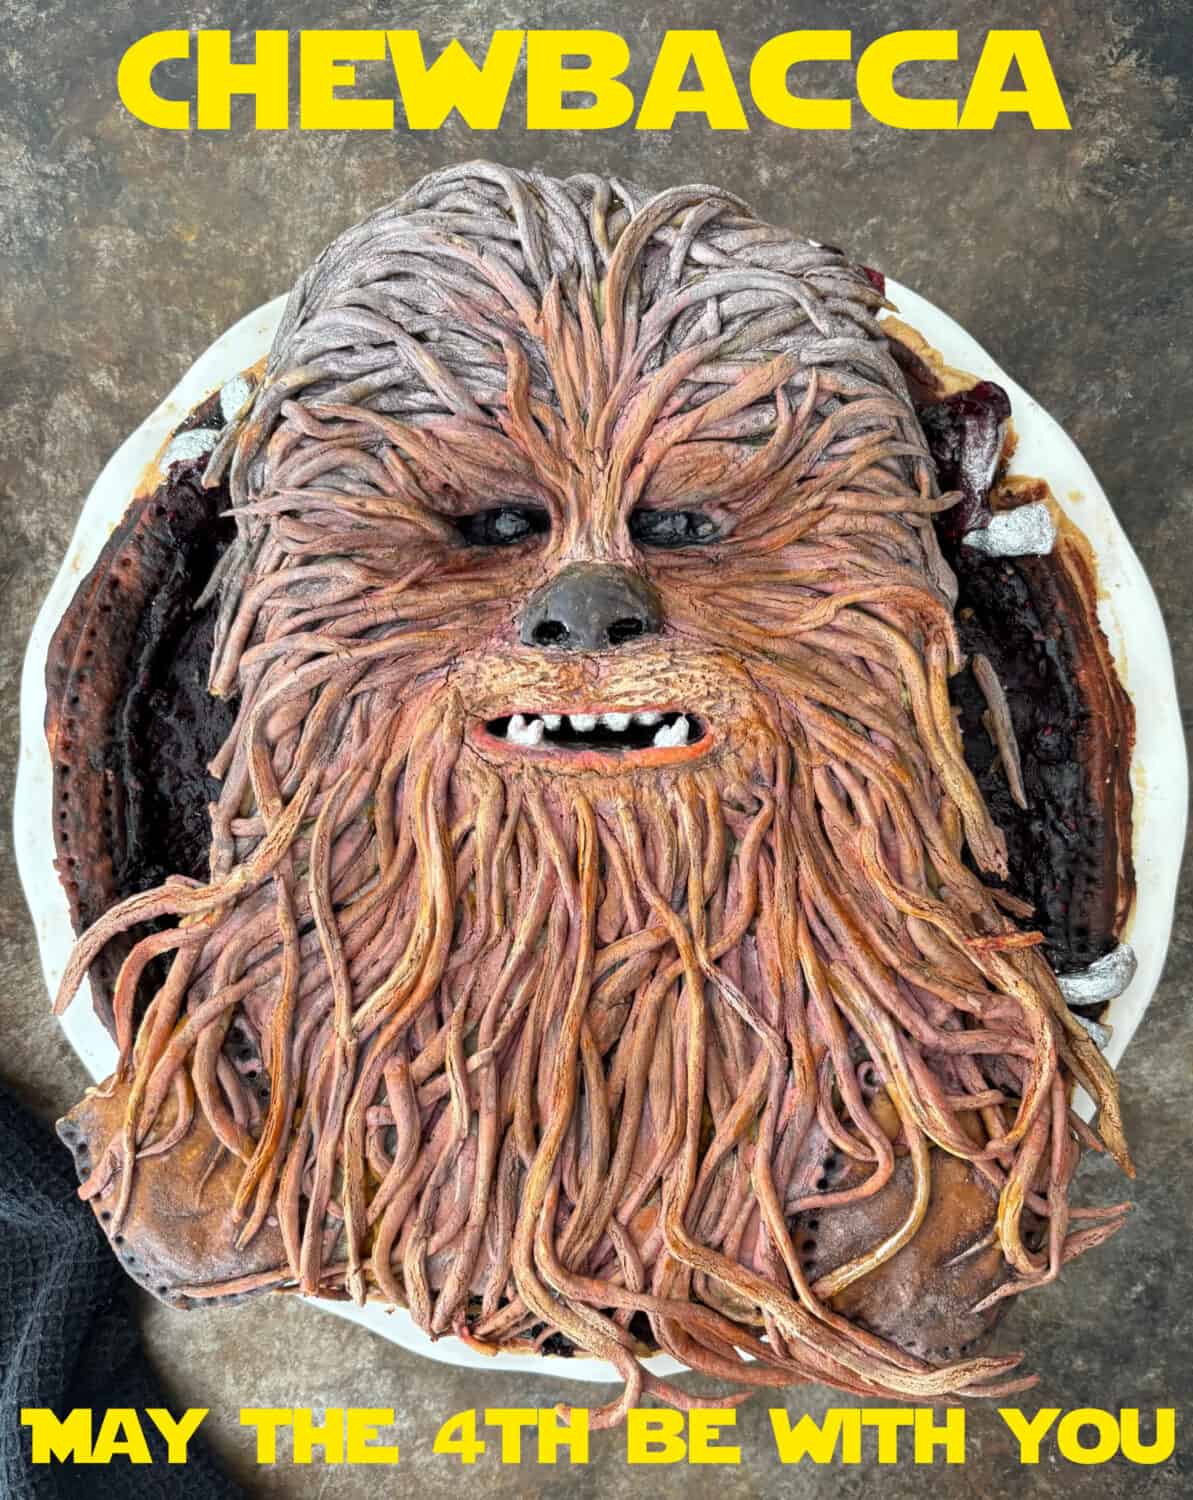
Chewbacca-Star Wars: May the 4th Be With You! It’s that time of year to channel your inner Jedi; fighting alongside Chewbacca would be my ultimate choice. Oh, that mysterious all knowing Wookie is a stalwart force to be reckoned with; and now he’s immortalized in pie.
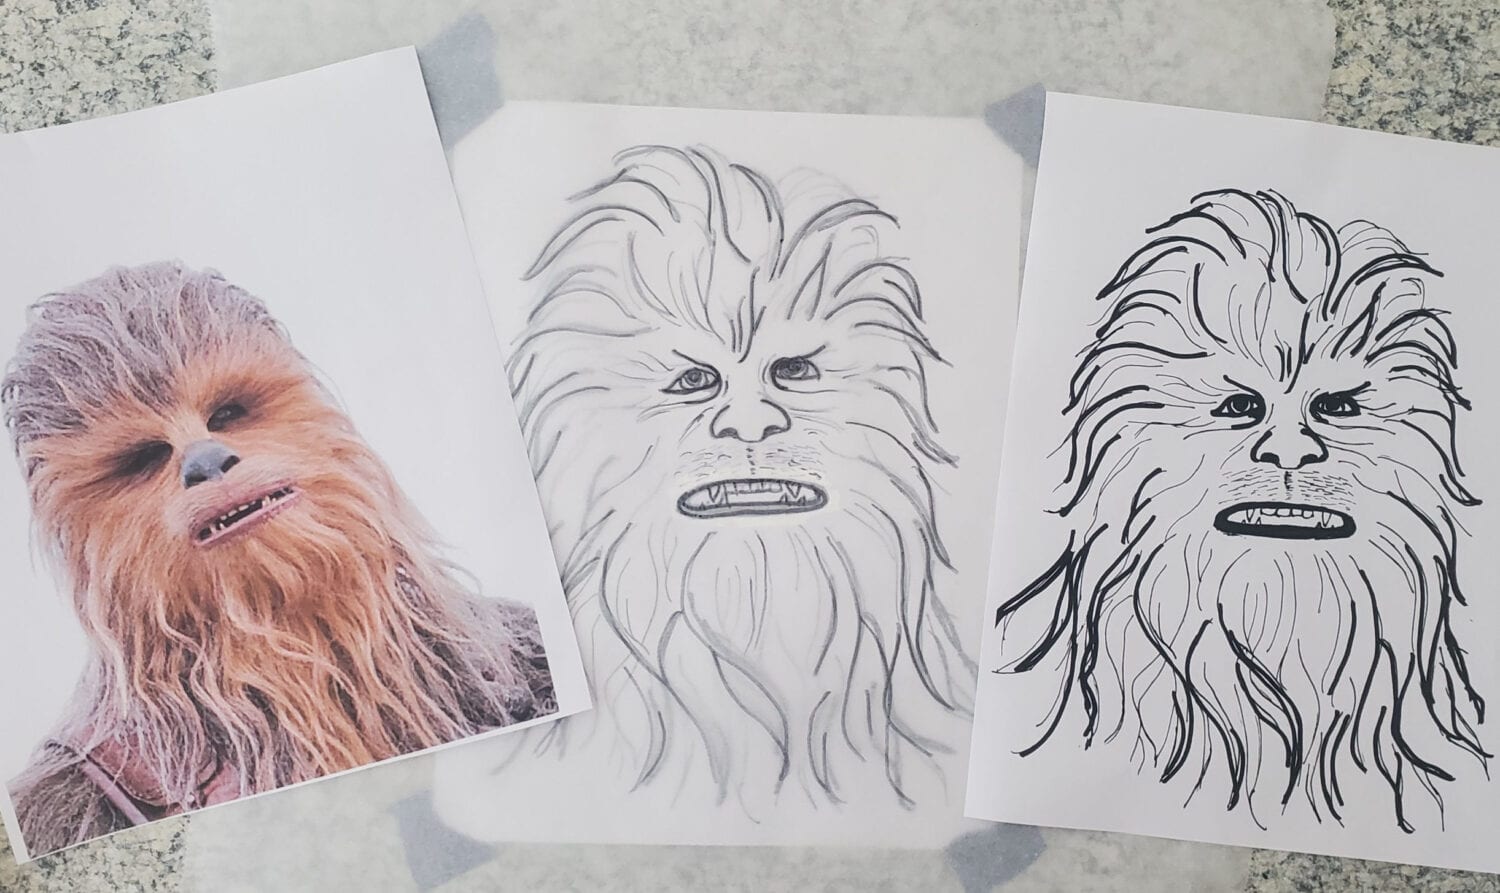
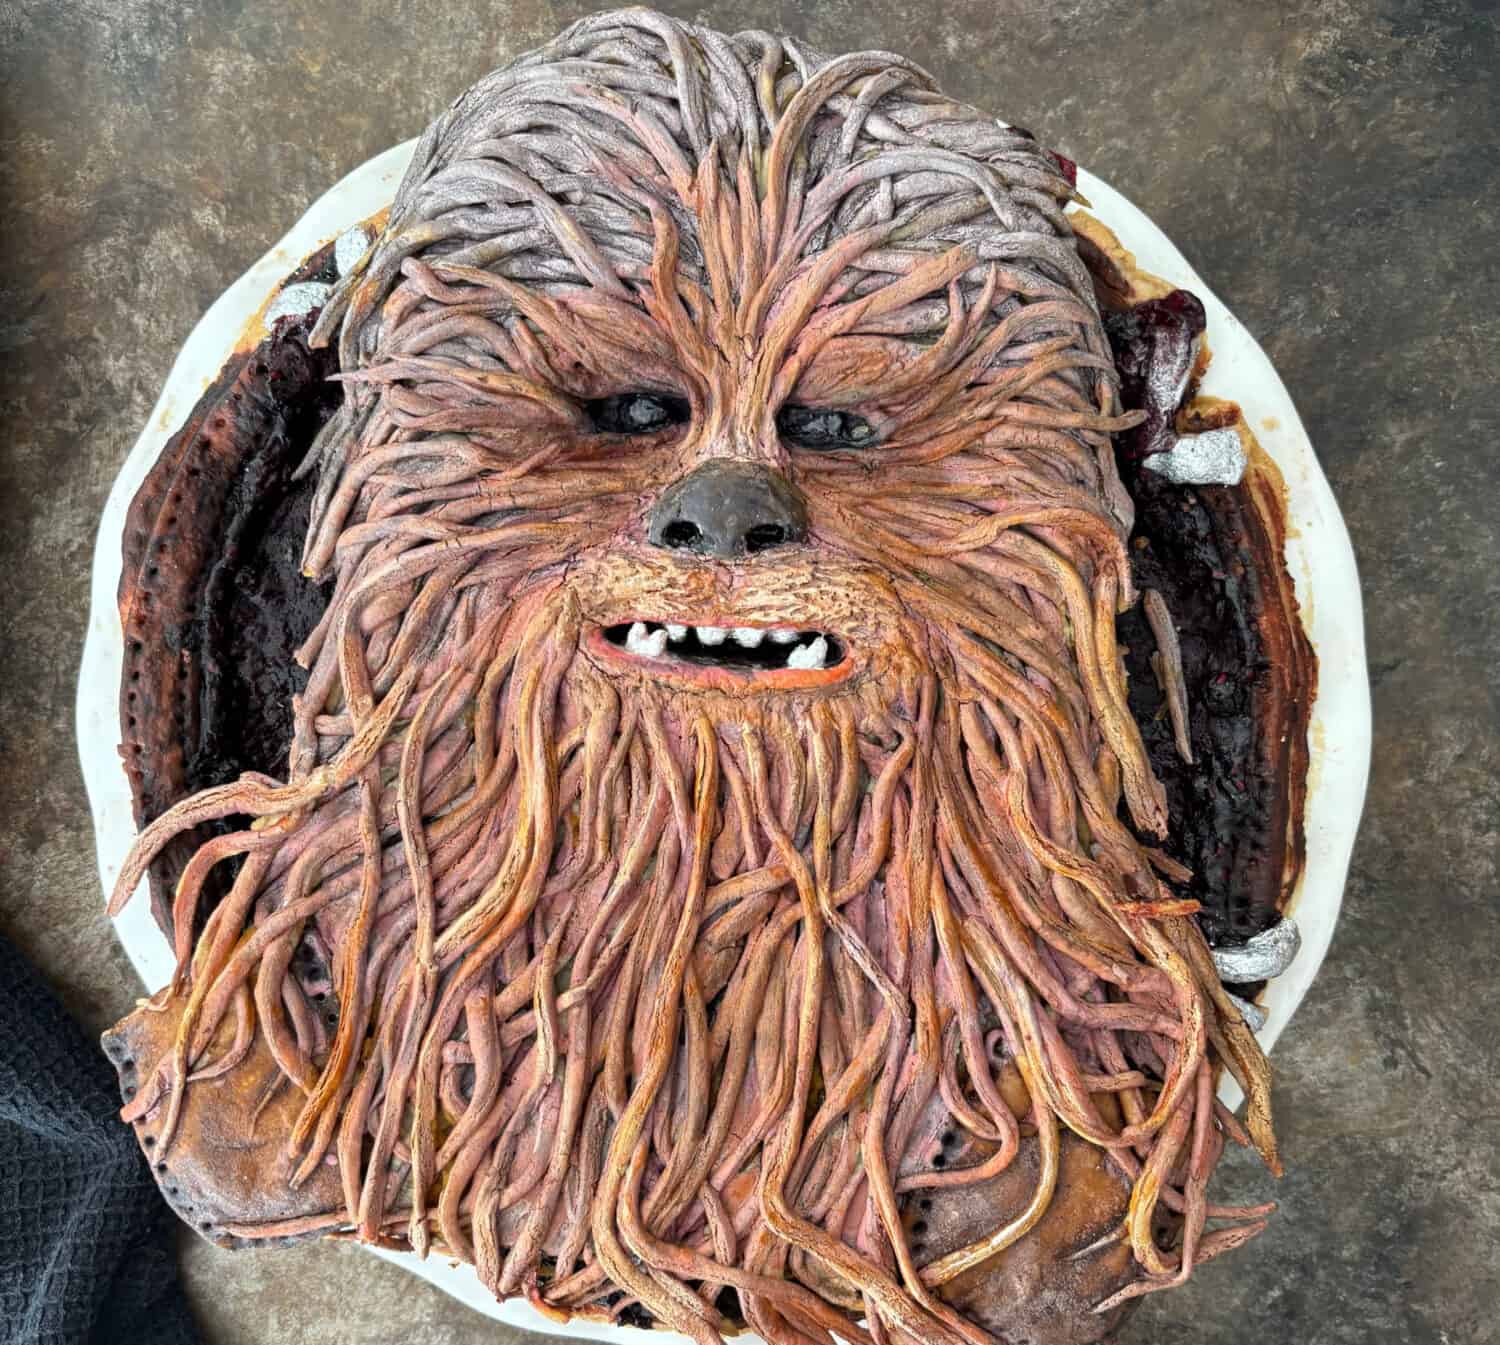
Chewbacca has deep set steely blue eyes and the bridge of his nose is fairly pronounced. You can’t forget the teeth in his mouth which is nearly always open, and his hair. Chewy needed highlights too for as authentic as Wookie hair could be.
To get this intergalactic pie started, choose the Wookie picture you plan to use (the pics/drawing I used are attached below). Also, use a 10-inch diameter pie plate if you have one. The bigger the pie plate, the better the Wookie. Trace the diameter of your pie plate onto parchment. Then, trace Chewbacca, and make sure it fits to outer edges. Attached below are my tracing and picture, you can download the PDFs for printing:
I also attached a link for the condensed video of creating Chewbacca, the Wookie. It’s under 1 minute but you can see the progression in action!
Pie Crust Base & Build Up:
- Trace Chewbacca, loosely, just for outside shape, eyes, and mouth placement.
- Roll up pie dough for brow/forehead, nose, bridge of nose, mouth and chin.
- Roll out and layer on another pie crust layer for a nice smooth surface for all that “hair.”
- Roll out pie dough and use a pizza cutter to cut strips, strips, and more strips.
LAYER, LAYER, LAYER!
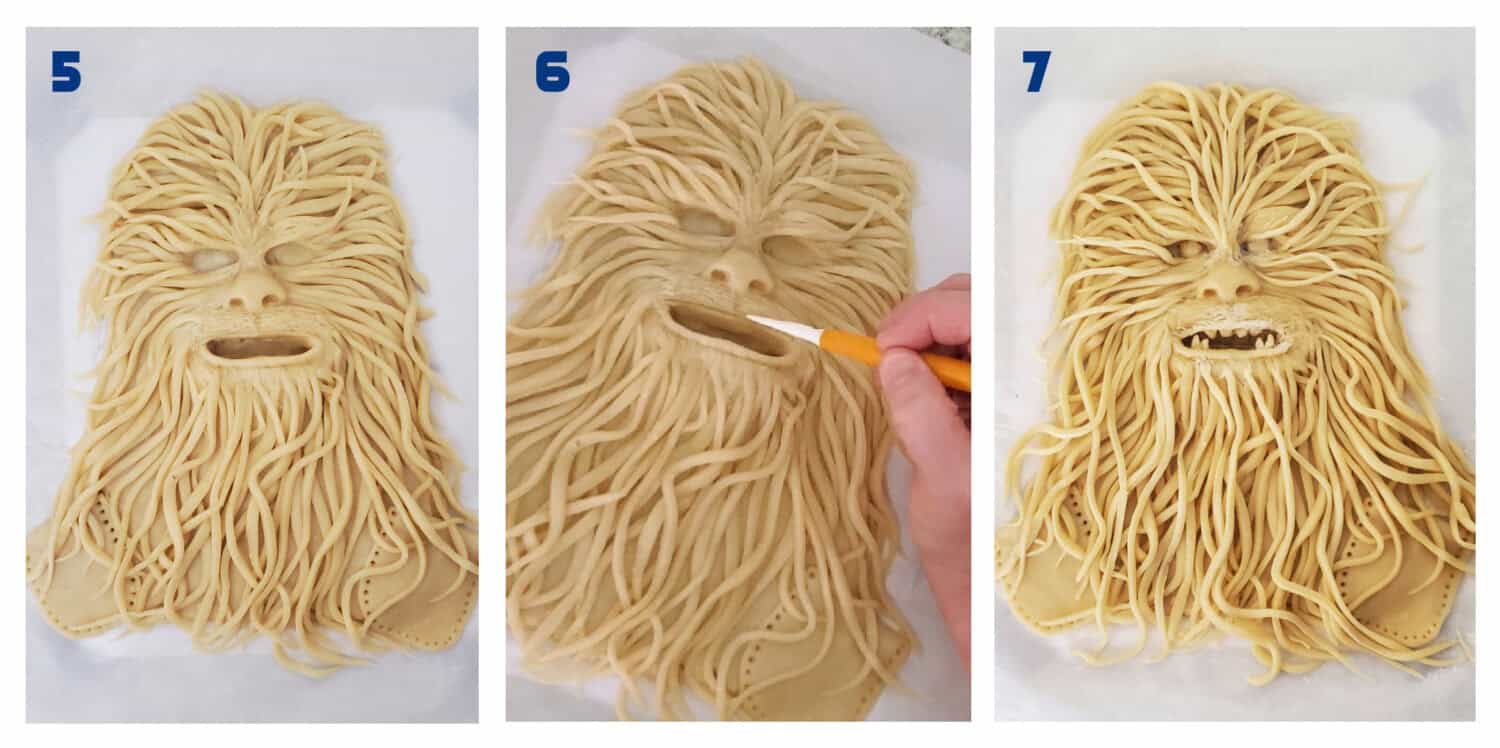
5. After you get a good layer of short strips, start making the strips longer, layering as you go. Refer to the original picture of your Wookie as a guide. Build up around the eyes too. Don’t forget to add epaulets on the shoulders; this helps the pie topper sit on the pie plate after baking.
6. Use fondant tools to etch in his upper ‘stache and shape around his mouth. Add in the teeth; you can make the teeth “thick” for stability, using a fondant tool to make them look smaller and pointy.
7. Add MORE hair, MORE LAYERS! I realized I had too many gaps and really wanted it full. This is a great time to add the eyeballs. Surprisingly, smaller pieces of dough for the eyes worked so much better. Chewbacca has very small deep-set eyes, hence that Wookie stare into your soul look.
Phew, you’re almost done. To be honest, I worked on Chewy a couple of hours the first day and then popped him in the fridge covered in plastic wrap. Day 2, I picked up where I left off. Pro Tip: Tightly wrap the leftover dough in plastic wrap and refrigerate too. The dough is okay left out, but will turn “gray” overnight at room temp.
Painting with food coloring is my favorite part. Thin the food coloring with vodka so the food gel can dry quicker. Water will make the dough soggy.
I painted the eye sockets and mouth first, so they could dry before I did other finishing touches. For the “brownish-gray” hair I painted nearly his entire head with black, white, and a touch of brown. Test it out on a paper towel first. Then paint with abandon, letting the paint run into the bottom of pie base between the hair layers.
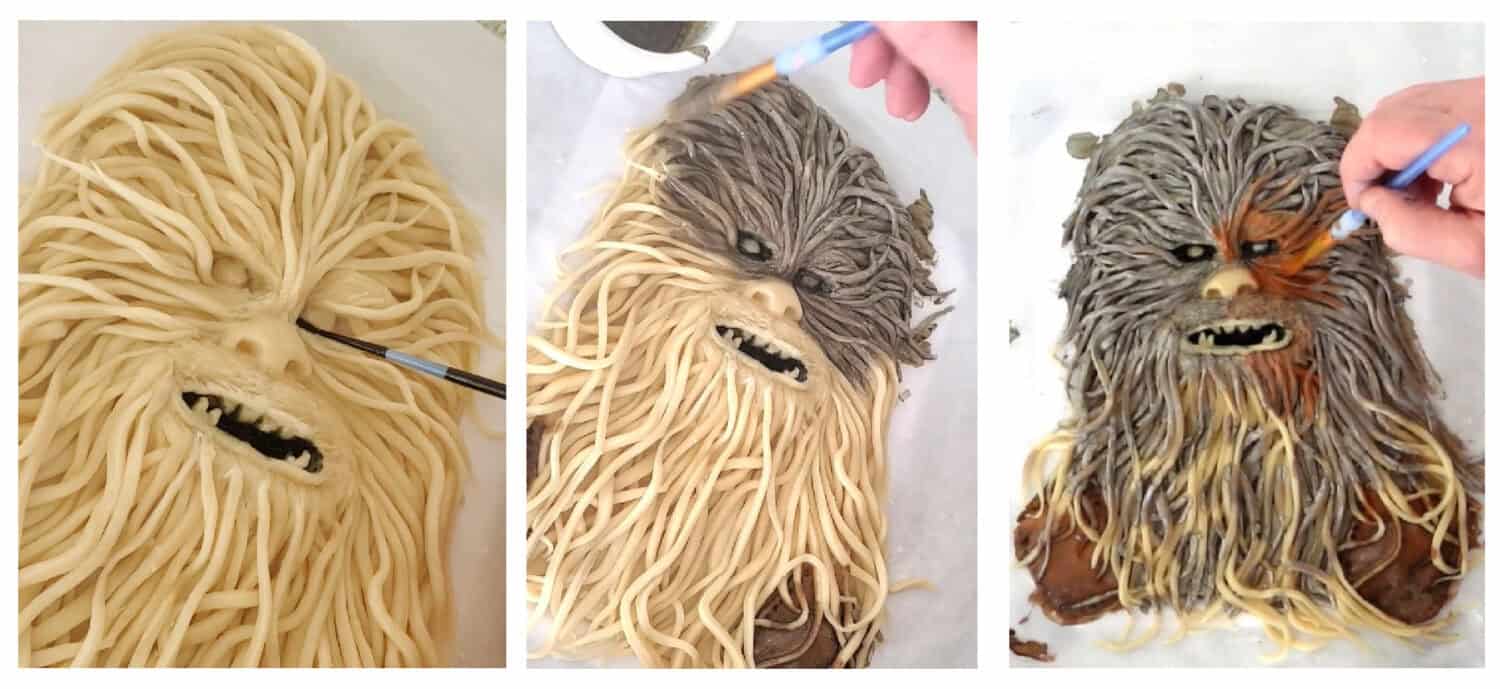
For Chewy’s signature hair look, Sienna is needed; brown, yellow, a touch of red and maybe a speck of black. Follow the coloring of Chewy on the picture you’re using. When I finished, I made the sienna darker and slightly redder and re-painted around his eyes. Chewy’s spa day included some much needed highlights. Coat a brush with white and wipe off most of the color for a “dry brush” approach for highlights.
I also used some of the vodka to thin the black gel even more to “fill” in the rivets on his epaulets. It’s the little things that add up to make a big difference.
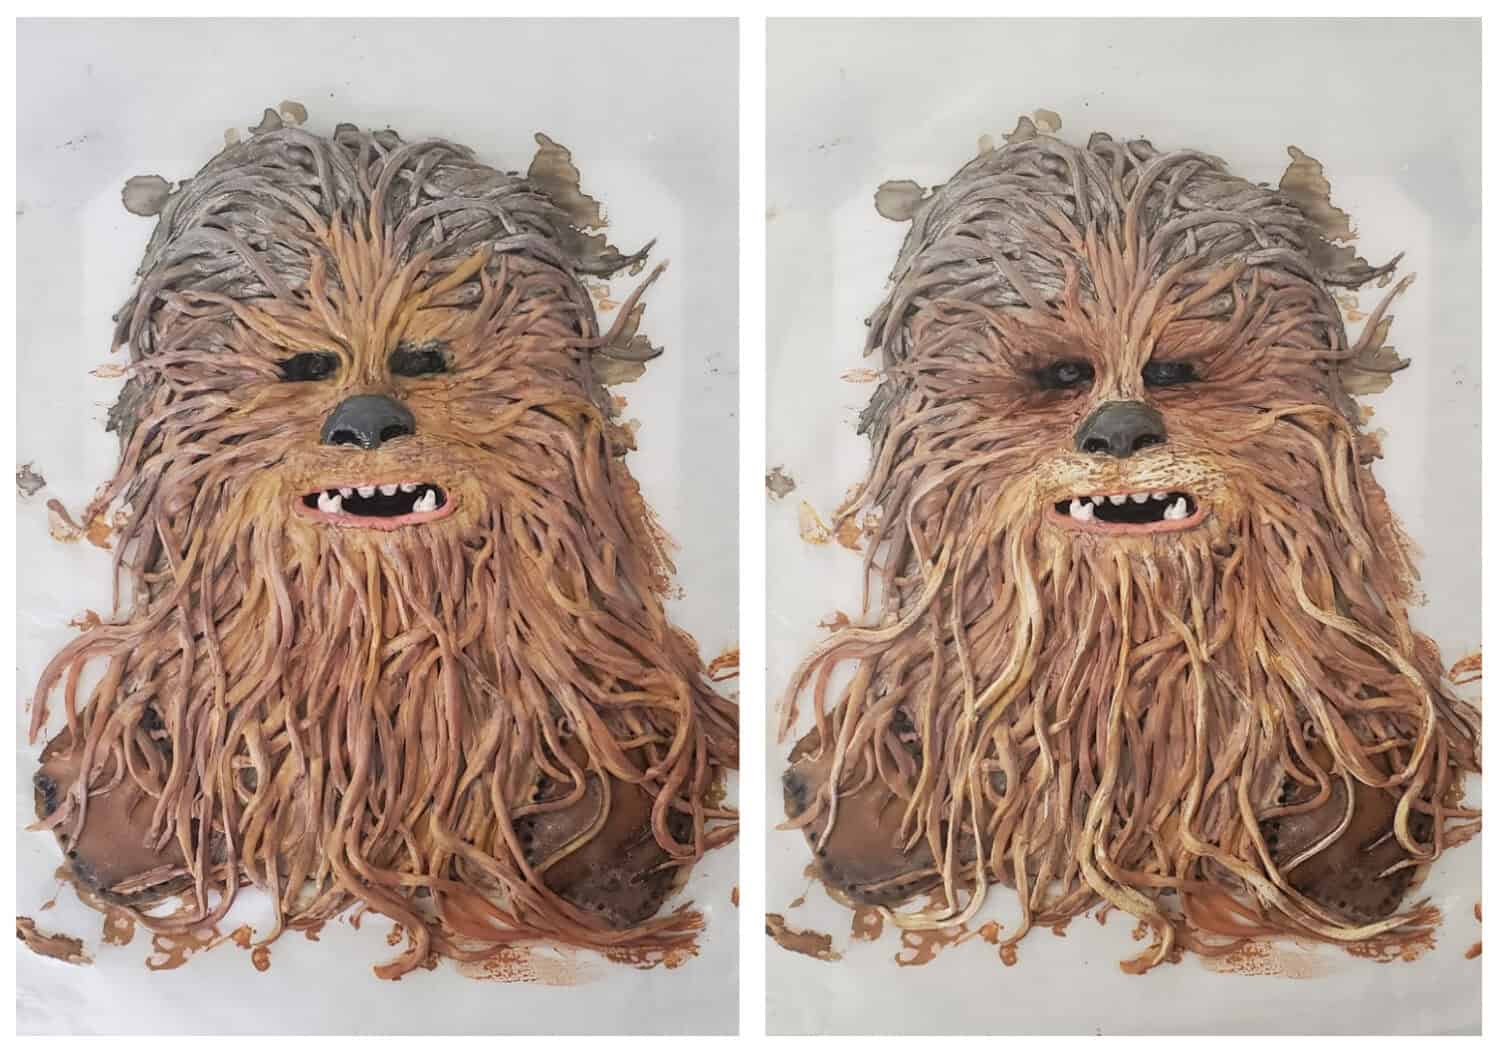
It may be a lot of work, but look at the left picture above compared to the right. Those extra brush strokes of highlights make a huge impact! Regardless of how your own Wookie looks, he’s gonna be fabulous!
Bake Chewbacca at 350 F for 35 minutes. Let the pie topper cool for about 30 minutes or longer before handling and before adding to the prebaked, prefilled pie bottom.
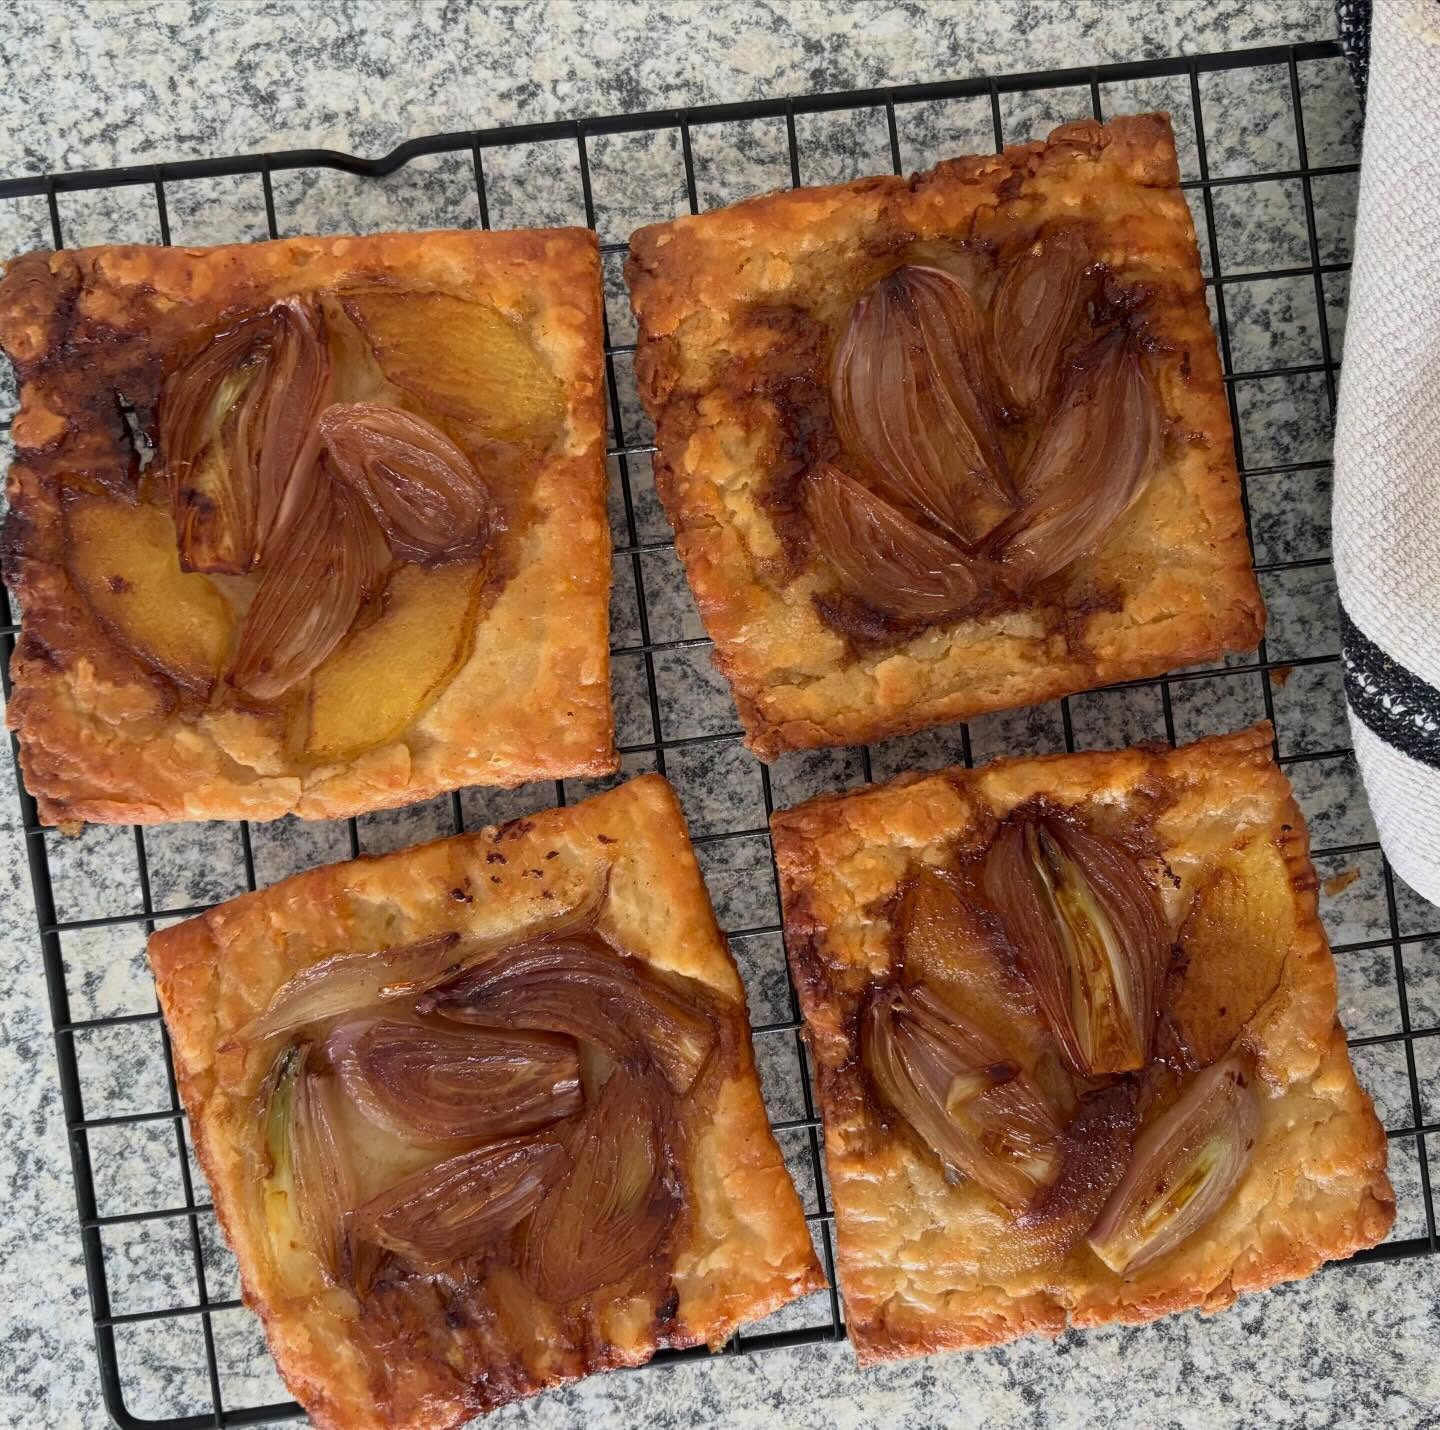
My other Star Wars Pies are: Baby Yoda, Jawa Chocolate Cream, Han Solo in Carbonite, individual Salted Caramel Apple Pies. My R2D2 is on a re-do list; compared to my other pies he’s a little shabby. Don’t judge me.
And, even though I am always afraid to bake an elaborate pie topper like this, Chewbacca came out from the oven stellar! I was so dang happy! Above all, have FUN in the empirical journey!
And, if you don’t have a pizza cutter or need some “good” food coloring get, here are helpful products used to create this Wookie:
Chefmaster Bright White Food Gel Coloring
Chefmaster 12-pack Fade Resistant Food Gel Coloring
This page contains an affiliate link(s).

Chewbacca-Star Wars: May the 4th Be With You
12
servings35
minutes20
minutes3
hoursChewbacca-Star Wars: May the 4th Be With You. Our favorite Wookie immortalized in pie, just in time for May the 4th Celebrations.
Ingredients
- Grandma’s Pie Crust (this is a large batch for bottom crust and pie top)
4 cups all purpose flour
1-1/2 teaspoons salt
1/4 teaspoon baking powder
3 tablespoons sugar
1 cup butter
1 cup vegetable shortening
1 cup very cold water
- Pie Filling – 10-inch pie crust
5 cups of your favorite berry pie filling
- Color & Painting
Vodka (any drinking type of alcohol at least 80 proof or more)
Multiple colors of food gel coloring: Black, Brown, Red, White, Blue, Yellow and Orange
Food safe paint brushes
Directions
- Pie Crust Dough
- Preheat Oven to 350 F.
- In a large bowl, stir all of the dry ingredients together (flour, sugar, baking powder, and salt). Using a large tine fork or pastry cutter, cut in the shortening and butter of choice until pea-sized and crumbly.
- Add the cold water all at once and mix just until it forms a ball (do not knead or over mix). Divide dough into 4 dough balls. Cover remaining dough balls in plastic wrap.
- Roll out one dough ball on a generously floured surface about 2 inches wider than the pie plate As this is a soft dough, roll up on to rolling pin and unroll onto pie plate.
- For Chewbacca I did make the edge look like his epaulets, but the pie topper covered most of it. Leave the edges plain or painted brown like his epaulets, or anything you want.
- Add the pie filling. Loosely cover the pie with foil and bake for 45 minutes. Remove foil and bake an additional 15 minutes to brown up the edges if needed. If the edges are done to your liking and the pie filling is bubbling, you can remove it from the oven and let it cool.
- Pie Topper Creation
- Print or trace the outline of the Chewbacca head you plan on using. Tape onto countertop and tape an additional piece of parchment over the top.
- Roll out one of the dough balls into an oblong and cut out the edges of your Chewbacca. Using pictures and drawing as a guide, build up brow, bridge of nose, nose, chin, and around eyes. (See pictures and video provided.)
- Using the leftover dough from the cutout, and adding more to it, roll out another oblong about 1/8-inch thick to cover the bottom build up. Smooth in by hand into crevices, etc.
- Roll out another section of dough, 1/8 inch thick, and using a pizza cutter cut multiple strips, a few at a time. Start by adding short strips to his head and increase to longer strips as you work around him. Add epaulets, more layers around eyes, and more hair as you see fit. (See pictures and video provided.)
- Use custard cups and paper plates to mix food gel to the color scheme you want.
Gray-Brown: White, a little bit of black and brown
Sienna: Brown, red, yellow, orange and a little black (yes, red and yellow make orange, but it’s not a true orange)
Red Sienna: Add more red to Sienna
Eyes: White with a tiny bit of blue
Epaulets: Add more black to Sienna
Highlights: White, basically dry brushing. If it gets too white, go back over it with the Sienna. - Transfer completed pie topper to a baking sheet by carefully holding edges of parchment. Bake at 350 F for 35 minutes. Let cool at least 30 minutes or longer before handling and transferring to the completed bake pie bottom.